What is the potential of Google Looker Studio Buttons?
Google Looker Studio button function has several advantages. To move between reports or report sections, use the buttons. Buttons improve the user experience and allow templates to make Looker Studio easier.
Users can do actions within a report by using buttons. Use a button, for instance, to download a CSV file or to update the data.
Why not make it simpler for users to explore particular data groups? When you apply filters to a report using the buttons, you can.
There are several advantages to using Looker Studio buttons when working with data in reports.
Reports become more dynamic and exciting with buttons. This makes it possible for people to browse data more naturally. Buttons provide a quick and easy way to jump between report sections or carry out repetitive tasks.
Lastly, buttons improve the accessibility of reports for persons with disabilities, including screen reader users.
3 Types of Buttons in Looker Studio
Looker Studio has three types of buttons: navigation, report actions, and filters. Here’s a brief overview of how each of the buttons could work for you and your users:
Navigation Buttons
Looker Studio’s navigation buttons make it simple for users to switch between reports and report sections. Navigation buttons can be used to include a table of contents or to provide connections to similar reports.
Navigation buttons are especially beneficial for lengthy, intricate reports with several sections.
Report Action Buttons
Convenience is the most critical factor for those who must read reports. Users can perform actions within a report by using the report action buttons. Users can save time and become more efficient when they do not need to navigate away from the report.
To make frequent tasks easier to access, use the report action buttons. These buttons can also be used to automate workflows.
Filter Buttons
Most reports provide more information than the typical user wishes or can process at once. Users can delve into specific data subsets by applying filters to a report using the filter buttons.
These buttons are convenient for reports containing a lot of data. They allow consumers to explore various data points swiftly.
Any feature that facilitates the handling and analysis of data is appreciated.
How to add Buttons in Looker Studio?
The dashboard is where you’ll start in Looker Studio when you’re ready to add buttons. Adding a button to Explore is an additional choice. Both methods have a similar procedure.
The actions to take are as follows:
- Open the Looker Studio dashboard.
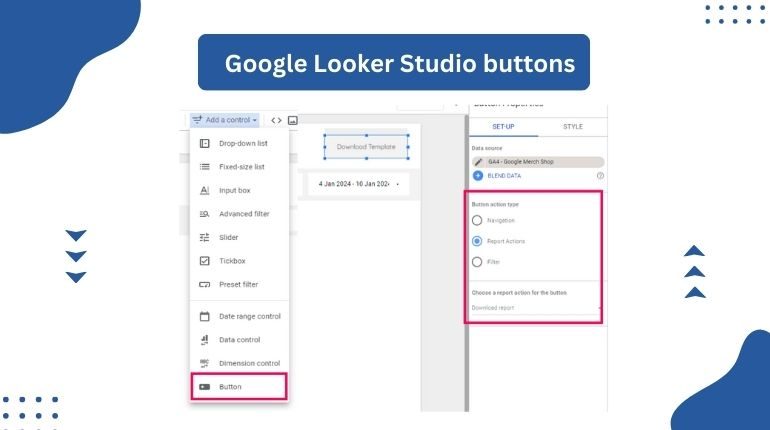
- In the upper navigation bar, select the “Add” button.
- Choose “Button” from the option that drops down.
- Change the look by going to “Button Settings.”
- Press the “Save” button.
- You can customise it in several ways. The button’s label, background colour, text colour, font size, and style are all customisable.
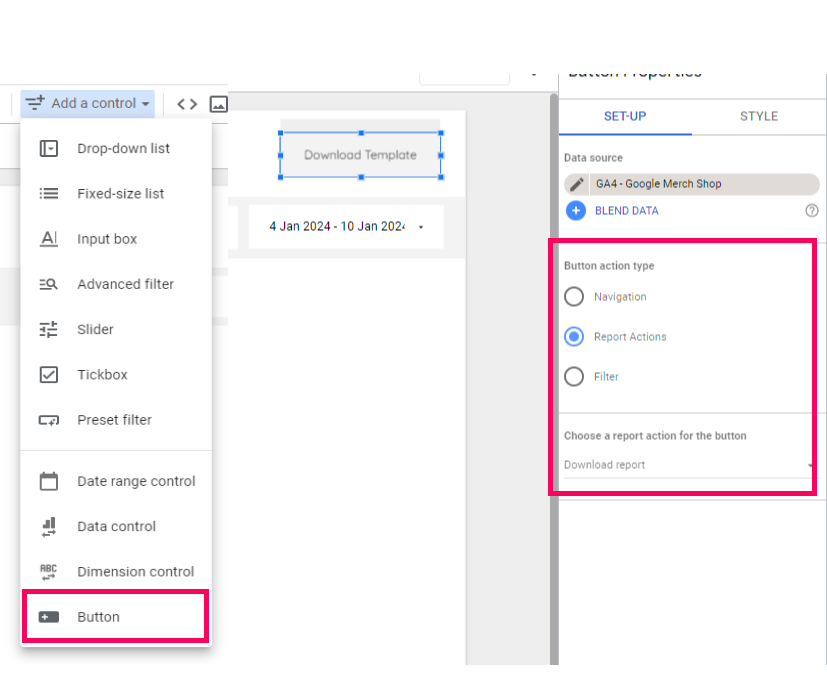
Various options exist for what can happen when a user hits a button. You can use the button to launch a Looker filter, execute a data action, or open a new dashboard, for instance.
Adding buttons to Google Looker Studio is easy to tailor to your requirements and tastes. By experimenting and being creative, you can improve the Looker dashboard’s usability and functionality by using buttons.
Options for Button Setup
One helpful feature is being able to customise the look of buttons. In Looker Studio, you have more setup options. Using these settings, you can set the specific actions linked to each button and the data source.
Here are a few alternatives for setting up the buttons:
Label for Buttons
You can alter the button’s text label by modifying its label. Give your button a concise and informative label that explains how it works using the button label option.
Icon Button
Select the icon that will appear on your button. Icons can make it easier for users to grasp what a button performs by helping to communicate its purpose or function visually.
Button Shape
The button’s shape can be altered to a circle, rounded rectangle, or rectangle. This feature aids in the creation of more aesthetically pleasing and intuitive buttons.
Button Size
To make the button less intrusive or more noticeable:
- Change its size.
- Ensure that the buttons are sufficiently large to be clickable and easily viewed.
- Avoid making them so big that they overpower the surrounding information.
Colour of Button
Modify the button’s colour to blend in with your dashboard’s colour scheme. Selecting a colour for the button that contrasts with the colour scheme is another method to employ colour.
Buttons’ Actions
When a button is pressed, you can configure it to do specific actions, including applying a filter, opening a URL, or launching a data action. Creating buttons that carry out particular functions or duties is made simple with Looker Studio.
Do you need assistance modifying Google Looker Studio?
Thanks to their easy-to-use interface and customisable settings, buttons are a welcome tool for anyone wishing to produce interactive and user-friendly reports in Looker Studio.
Using templates is another method to use Google Looker Studio’s new button functionalities. Using pre-made templates, Databloo specialises in assisting companies with the automation of digital reporting.
Let’s get in touch so we can assist you with organising your marketing data!